How to create a Duration Timesheet plan
Learn how to create a Duration Timesheet Plan and the recommended settings to use.
📝 Note
This guide only covers the steps for creating a Duration Timesheet plan. To learn more about what a Clock In/Out Timesheet does and how it looks, have a look at the Time module Overview and How to create a Clock-In/Out Timesheet plan.
Steps to follow:
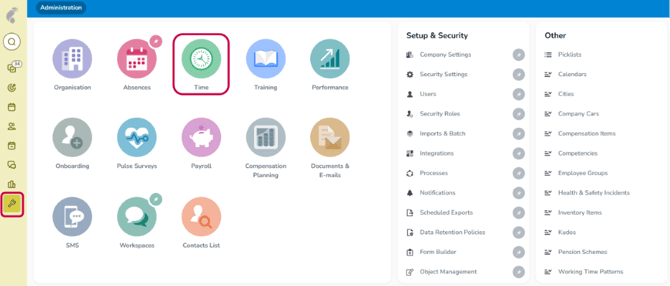
- Navigate to Administration then select Time
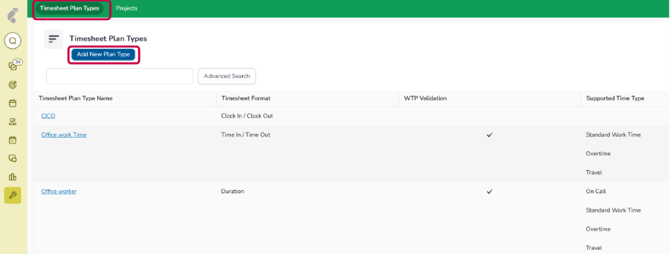
- Click on Timesheet Plan Types
- Select Add New to create a new Timesheet type
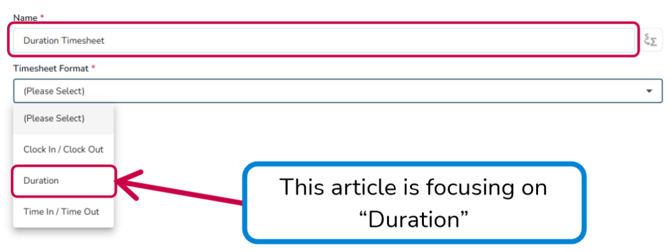
- Name this timesheet something distinct that is easy to remember
- Choose the correct Timesheet format
-
Enable all relevant options for the Timesheet
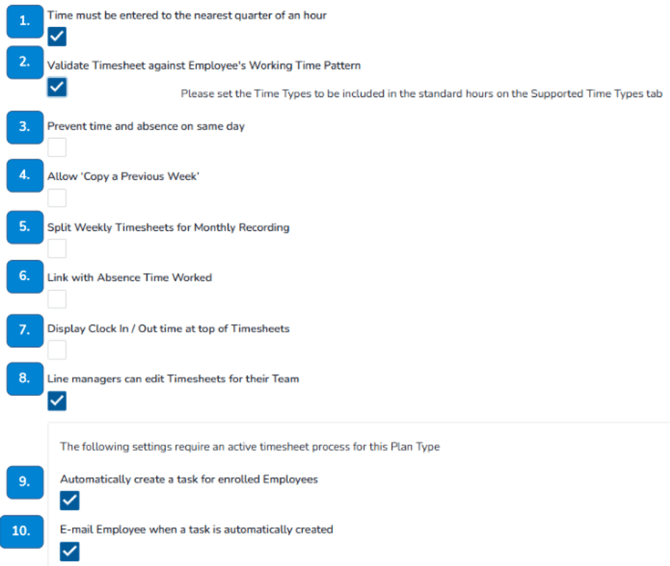
You have now made your Timesheet! Before you can send this out to anyone, you will need to make at least one Project and one Linked Activity.
If you need a refresher on how to set these up, have a look at the How to create Projects & Activities guide.
📝 Note
If you have selected to validate the timesheet against the employee's working time pattern in the Details tab, you will need to select which Time Types to Include in Standard Work Time and / or have a Checkbox rather than Number Entry.
Checkbox would usually only be used in cases where you are needing it for payroll purposes.
Timesheet tick box options
1. Time must be entered to the nearest quarter of an hour
If ticked, employees must enter their time in quarter-of-an-hour increments.
For example:
- 1 hour 15 minutes = 1.25
- 1 hour 30 minutes = 1.50
- 1 hour 45 minutes = 1.75
If not ticked, employees can enter their time using any two-decimal value.
For example:
- 1 hour 5 minutes = 1.08
- 1 hour 10 minutes = 1.17
- 1 hour 20 minutes = 1.33
2. Validate Timesheet against Employee's Working Time Pattern
If ticked, the scheduled hours for each day display on the Timesheet and are validated as employees enter their activities.
The scheduled hours initially display in yellow. Once an employee has entered their full hours for the day, the value changes to 0.00 and turns green.
Note: If this option is not ticked, timesheets will still display non-working days and bank holidays.
Once you have enabled this option, select which Time Types to include in your Standard Hours using the Supported Time Types tab.
3. Prevent Time and Absence on Same Day
If ticked, employees cannot enter activities on a day when they have an absence, including:
- Sickness
- Holiday
- Other absences
Important note: If ticked, this prevents employees from entering time on a day even if the absence is only for half a day.
4. Allow 'Copy a Previous Week'
If ticked, employees can use the Copy a Previous Week button to copy information from one of their previous four timesheets.
Once copied, they can make changes to the new timesheet as required.
5. Split Weekly Timesheets for Monthly Recording
Timesheets usually run from Monday to Sunday. If this option is ticked, a timesheet can be split at the end of the month when the month ends mid-week.
This is typically used to support payroll requirements.
For example: If a month ends on a Wednesday, the employee receives two timesheets for that week: one from Monday to Wednesday and another from Thursday to Sunday.
6. Link with Absence Time Worked
This option links timesheets to absences to automatically create Time Worked records and calculate holiday entitlement.
When is this needed? Link with Absence Time Worked is only needed if timesheet entries should accrue an absence balance.
Note: This option is only available for employees enrolled on a Percentage-Based Absence Plan.
7. Display Clock In/Out at top of Timesheets
When used with a Clock In/Out plan, this option displays the number of hours an employee has worked to help them complete their timesheet.
If you have the Payroll module and use a Clock In/Out plan, we recommend enabling this option.
The number of hours clocked in displays above each day on the employee's timesheet.
8. Line Manager Can Edit Subordinate Timesheets
This option is ticked by default and allows Line Managers to edit their subordinates' timesheets outside of a workflow process.
For more information, see: Line Manager Can Edit Subordinate Timesheets.
9. Automatically create a task for enrolled employees
If ticked, a new timesheet task is created in each enrolled employee's inbox every Monday.
10. Send an e-mail to employee when task is automatically created
If ticked, an e-mail notification is sent to the employee when the task is created.
This option can only be used if Automatically create a task for enrolled employees is ticked.