.png?width=271&height=81&name=Knowledge%20base%20small%20(4).png)
- Company Profile - Keeping your logo, phone number, and company details up to date.
- Company Settings - Data retention, AI CV scoring, candidate opt-ins, SMS, two-step authentication, and rejection rules.
- Managing Users - Inviting new users and editing existing ones' access.
- User Permissions Overview - A full breakdown of what Normal Users, Admins, and Super Admins can each do.
- Managing Your Preferred Supplier List - Adding and requesting recruitment agencies for your PSL.
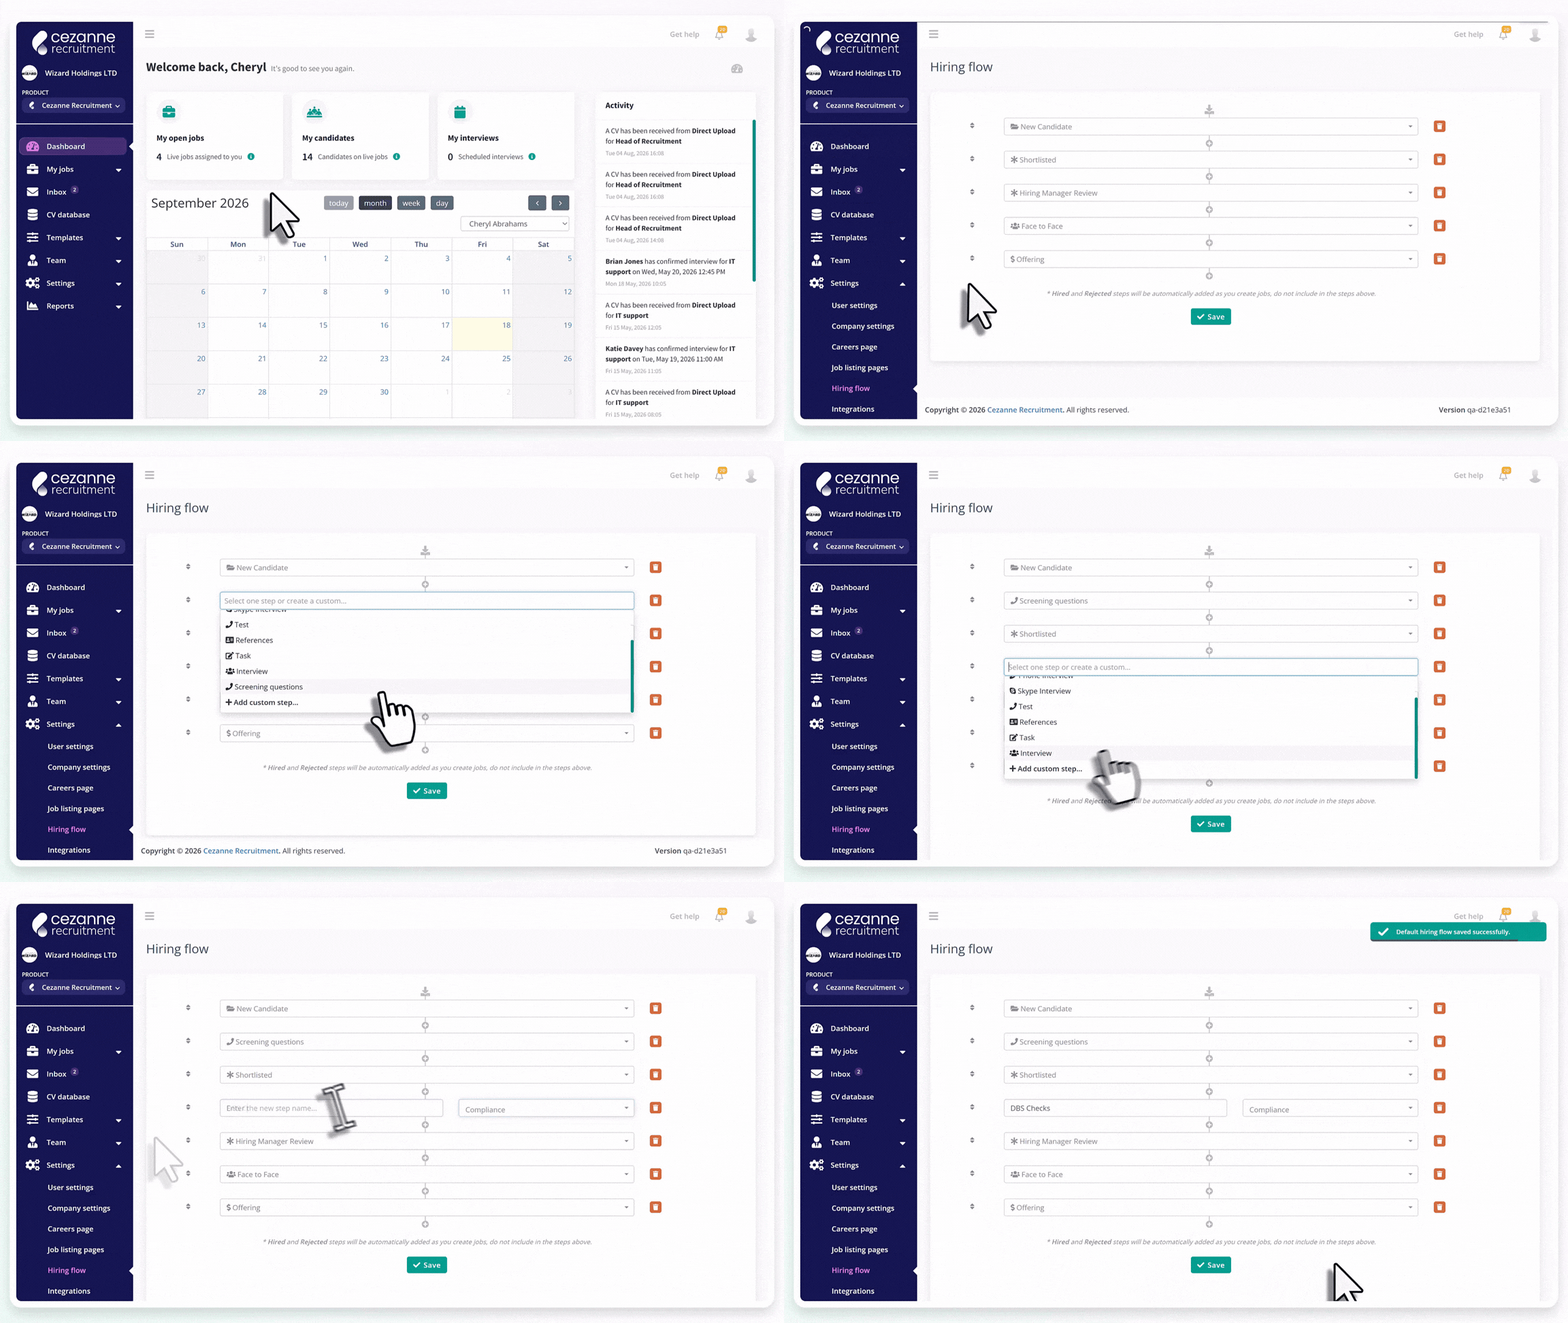
- Hiring Flow: Company Default & Per-Job Customization - Setting your company's default hiring stages and adjusting them per job.
- Company-Wide Notification Defaults & Language/Time Zone - How the New CV auto-response default works across your team.
- Calendar Integrations (Office 365) - Connecting Microsoft 365 calendars via Cronofy, including Entra admin consent and troubleshooting.
- Creating & Editing Email Templates - Building, editing, and sharing email templates across your team.
1. Company Profile
Manage your company profile by clicking the profile icon at the top right and selecting Company Profile.
You can update everything except the company name. Contact Cezanne support if you need to change the company name.
You can update details such as your phone number, logo, website, and more.
Upload a logo to make your profile stand out. It also appears on your application page.
You can also add a phone number if you want it available as a merge field in email templates.
Click Save when you're done.
.gif)
2. Company Settings
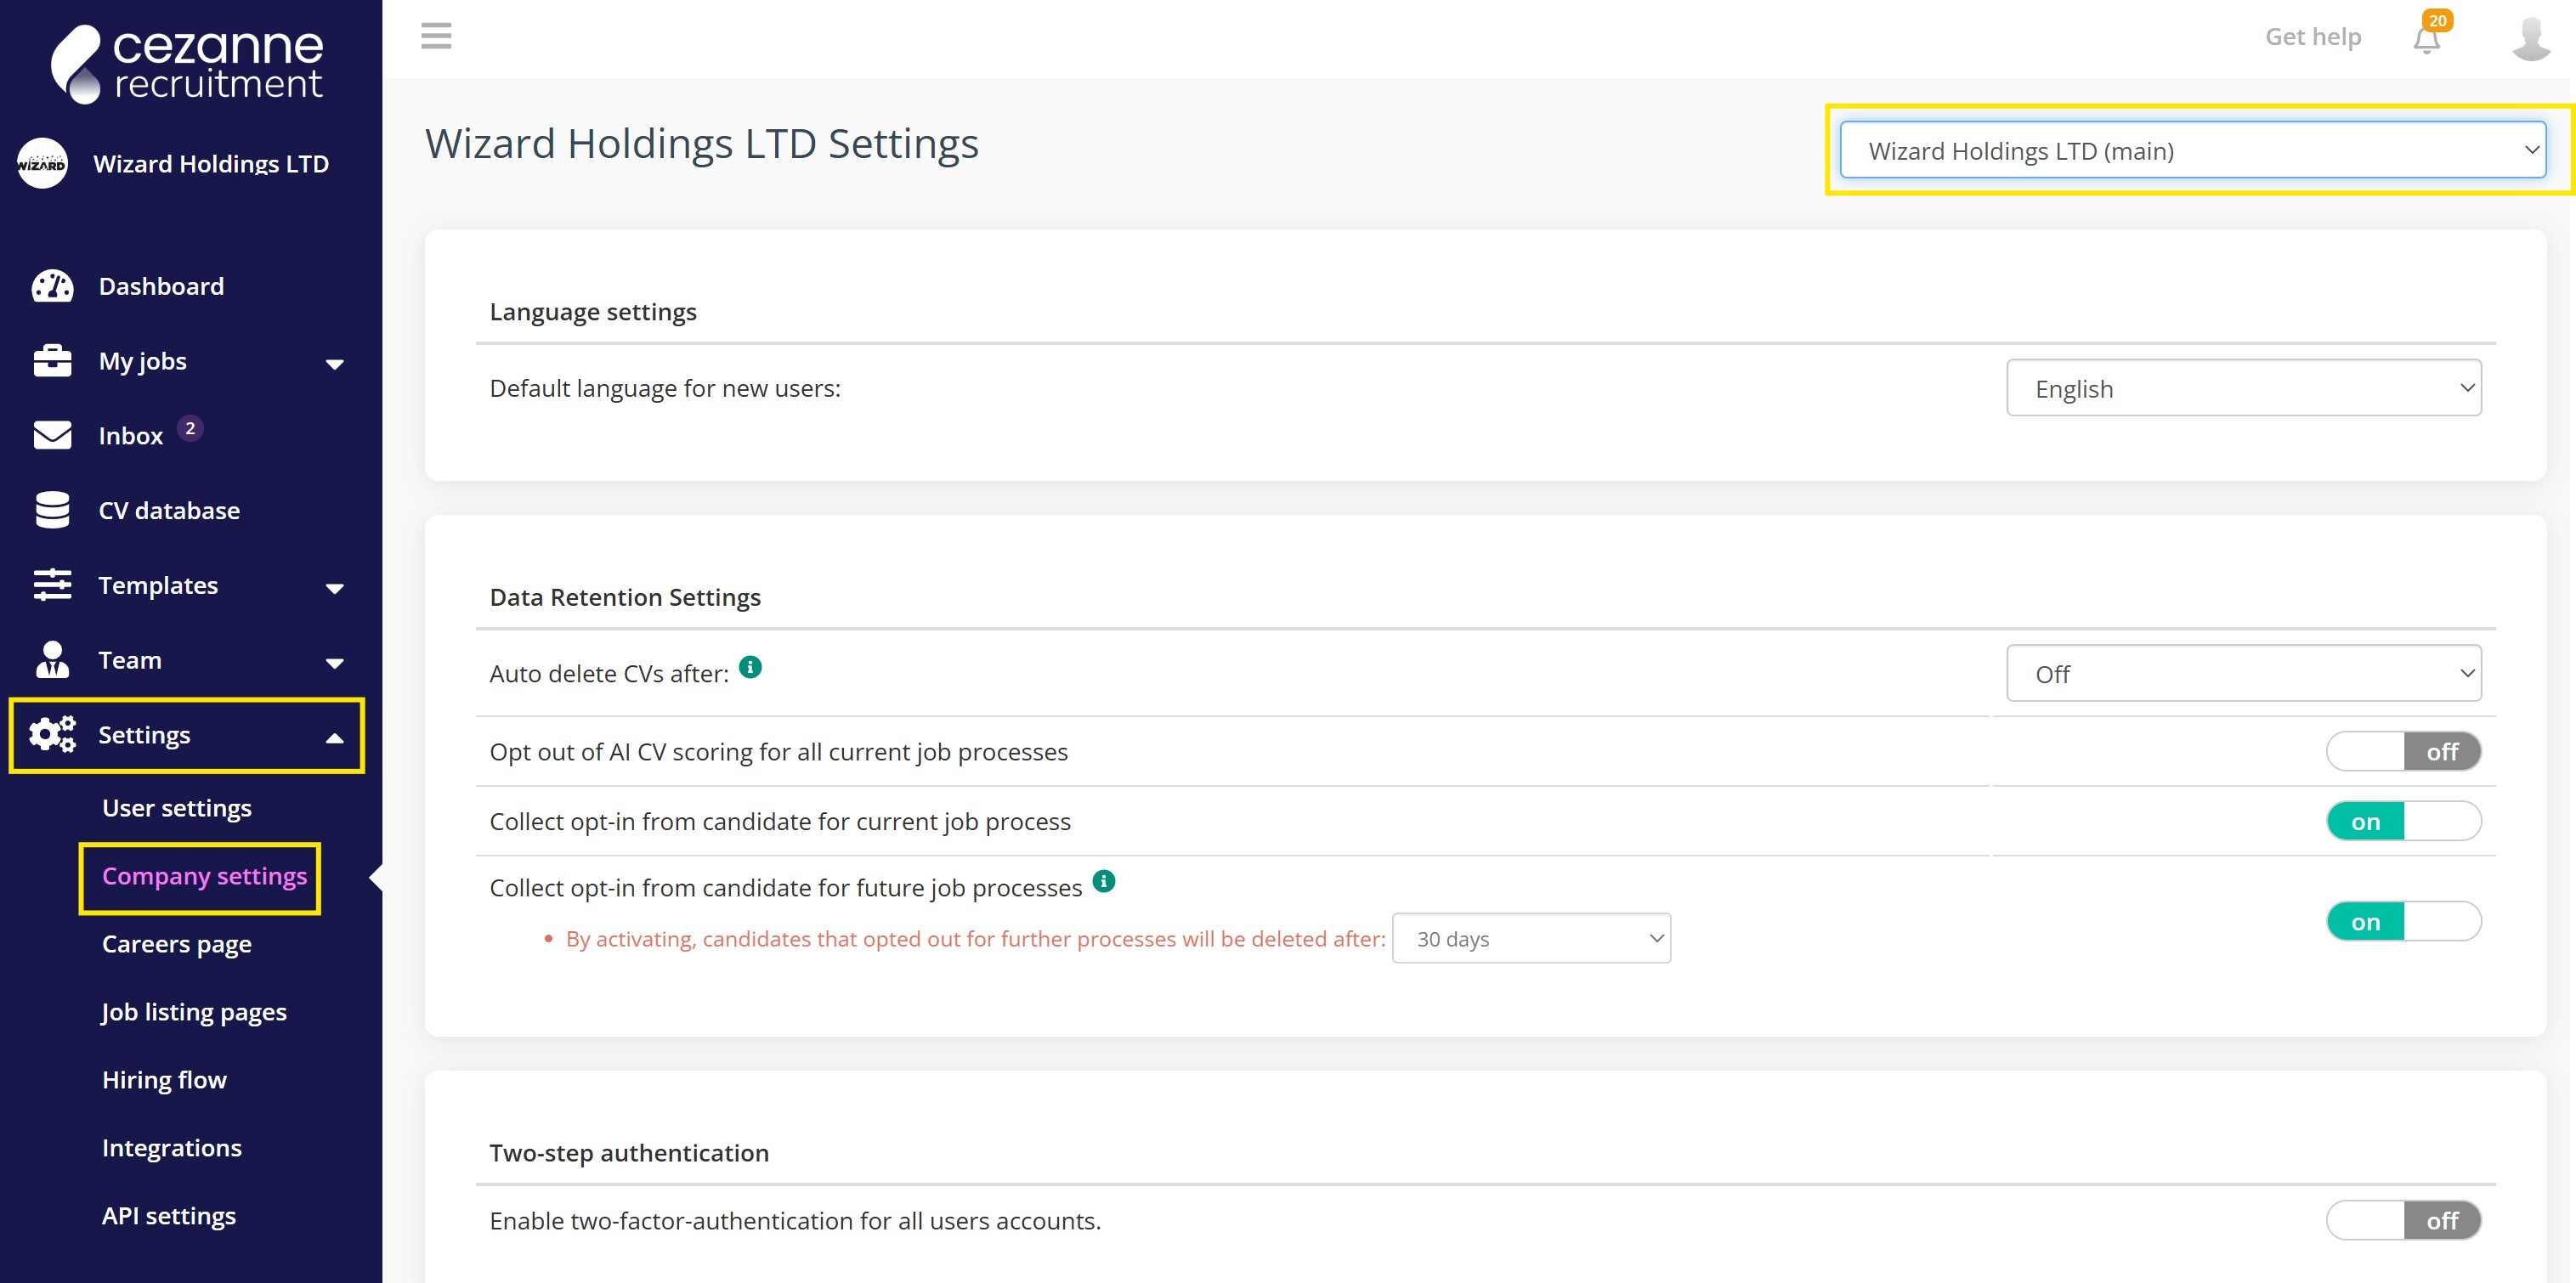
Go to Settings > Company Settings to manage:
- Data retention: keep CVs indefinitely, or set a retention period from 3 months to 2 years.
- AI CV scoring: opt out for all current job processes if you don't want CVs scored by AI.
- Candidate opt-ins: manage opt-in options for current and future job processes, shown to candidates on the application page. Candidates who don't opt in for future processes have their data deleted 30 days after their role closes.
- Inclusion compliance: enable demographic questions to support Equal Opportunity reporting. These preset question sets can't be edited to keep them compliant, and feed directly into diversity reporting.
- SMS settings: set up a sender ID to send SMS reminders. This can't be changed once set.
- Two-step authentication: enable as the default for all users.
- Rejection settings: make it mandatory to give a reason when rejecting a candidate.
If you manage more than one brand, each brand's company settings need to be configured separately. You can switch brands from the dropdown highlighted below.
3. Managing Users
Go to Team > Users to add or invite someone.
Enter their name and email and click Save. They'll get a welcome email and a dedicated Cezanne email address, so their personal address stays hidden from candidates.
They'll need to approve that address before they can start emailing candidates.
To edit an existing user's access, find them in the Users section and click the green pen icon. See User Permissions Overview in this guide for what each permission level allows.
You can also remove a user here. To delete an administrator, mark them inactive first, then delete them.
.gif)
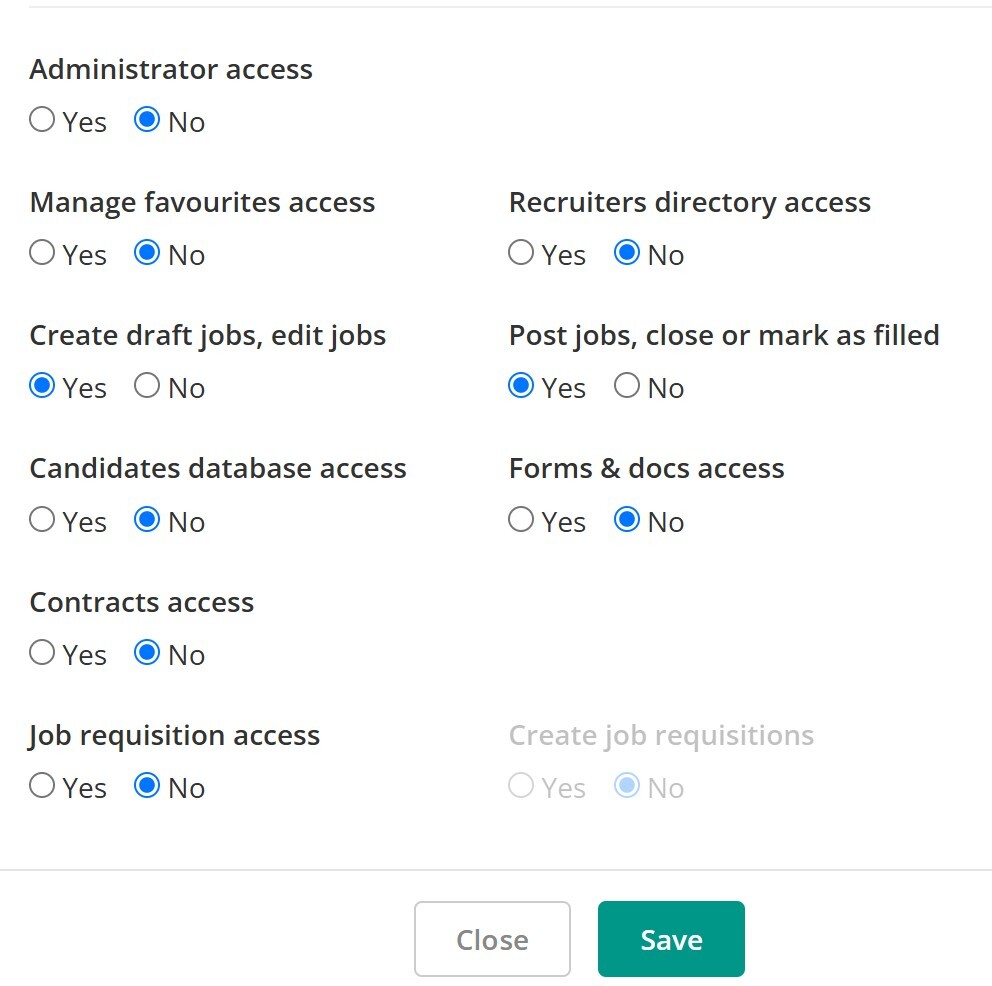
4. User Permissions Overview
Cezanne Recruitment has three user types: Normal User, Admin, and Super Admin.
'What Admins and super admins can do by default:
- Grant or remove the Admin role. Super Admin only.
- Access company settings, careers page, application page, job listing, hiring flow, integrations, API, custom fields, and billing settings.
- See and manage every job in the account. Normal users are restricted to jobs they own or are assigned to.
- Access the Users/team management page, and invite, update, or delete users.
- Access the full reporting suite.
- Edit shared email templates.
- Manage favourite recruiters.
What Normal Users can do regardless:
- Create, update, and publish jobs and act on candidates, but only for jobs they own or are assigned to.
- Edit their own custom email templates.
- Use inbox, messages, and notifications.
- Edit their own profile and settings.
What Normal Users can do if an Admin grants the specific permission:
Access the CV database, Favourite Recruiters, the Recruiters feature, Forms & Documents, Contracts, and Job Requisitions.
Only Super Admins can reveal sensitive candidate custom-field answers, sensitive Forms & Documents answers, and grant or remove the Super Admin role itself.
5. Managing Your Preferred Supplier List
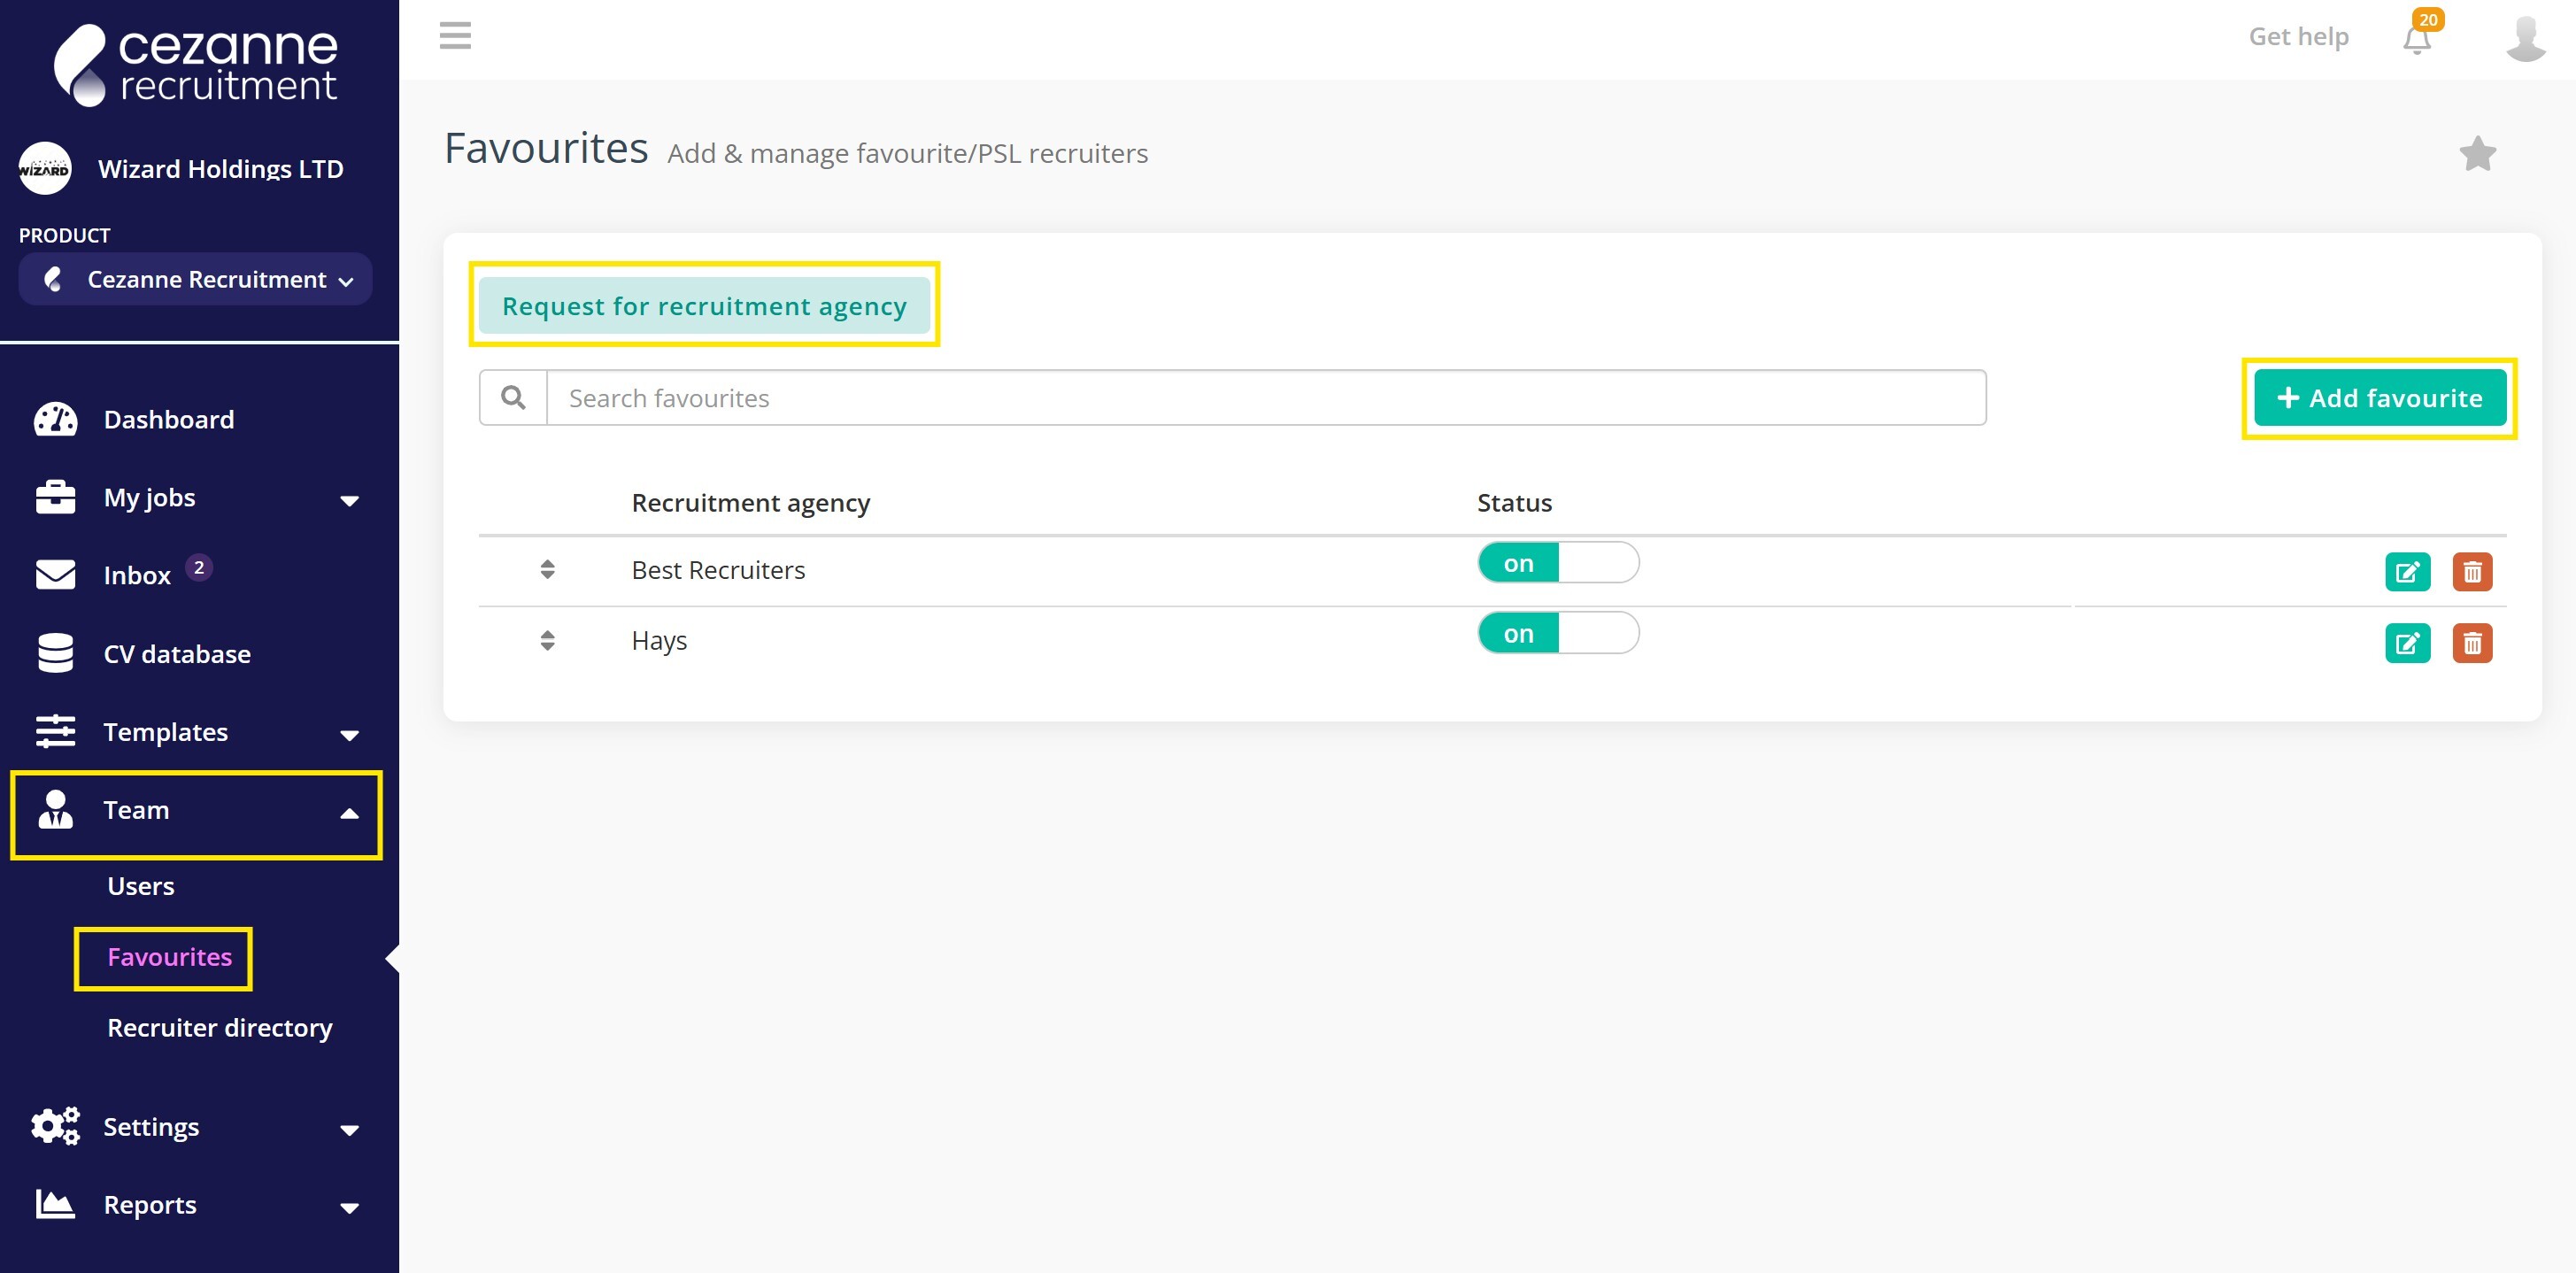
This area allows you to add in recruiters you like working with, so you can easily notify them when setting up a new job posting.
Go to Team > Favourites > + Add Favourite and enter the agency's name.
If they're already registered on Cezanne Recruitment, they'll appear automatically.
If not, click + Request for Recruitment Agency to ask for them to be added.
Contact support if you run into any issues.
6. Hiring Flow: Company Default & Per-Job Customization
.jpg)
7. Company-Wide Notification Defaults & Language/Time Zone
The New CV Notification auto-response is a setting you control company-wide.
Go to Settings > User Settings to turn it on or off.
If enabled, it applies to every user, and every application triggers the auto-response.
Its content and template are managed under Email Templates. See Creating & Editing Email Templates in this guide, where you can customise it.
Note: individual language and time zone preferences are set per person under each user's own Settings > User Settings.
See Your Notifications & Calendar Settings in the Hiring Managers & Recruiters guide. There isn't a separate company-wide language/time zone default beyond that.
.gif)
8. Calendar Integrations (Office 365)
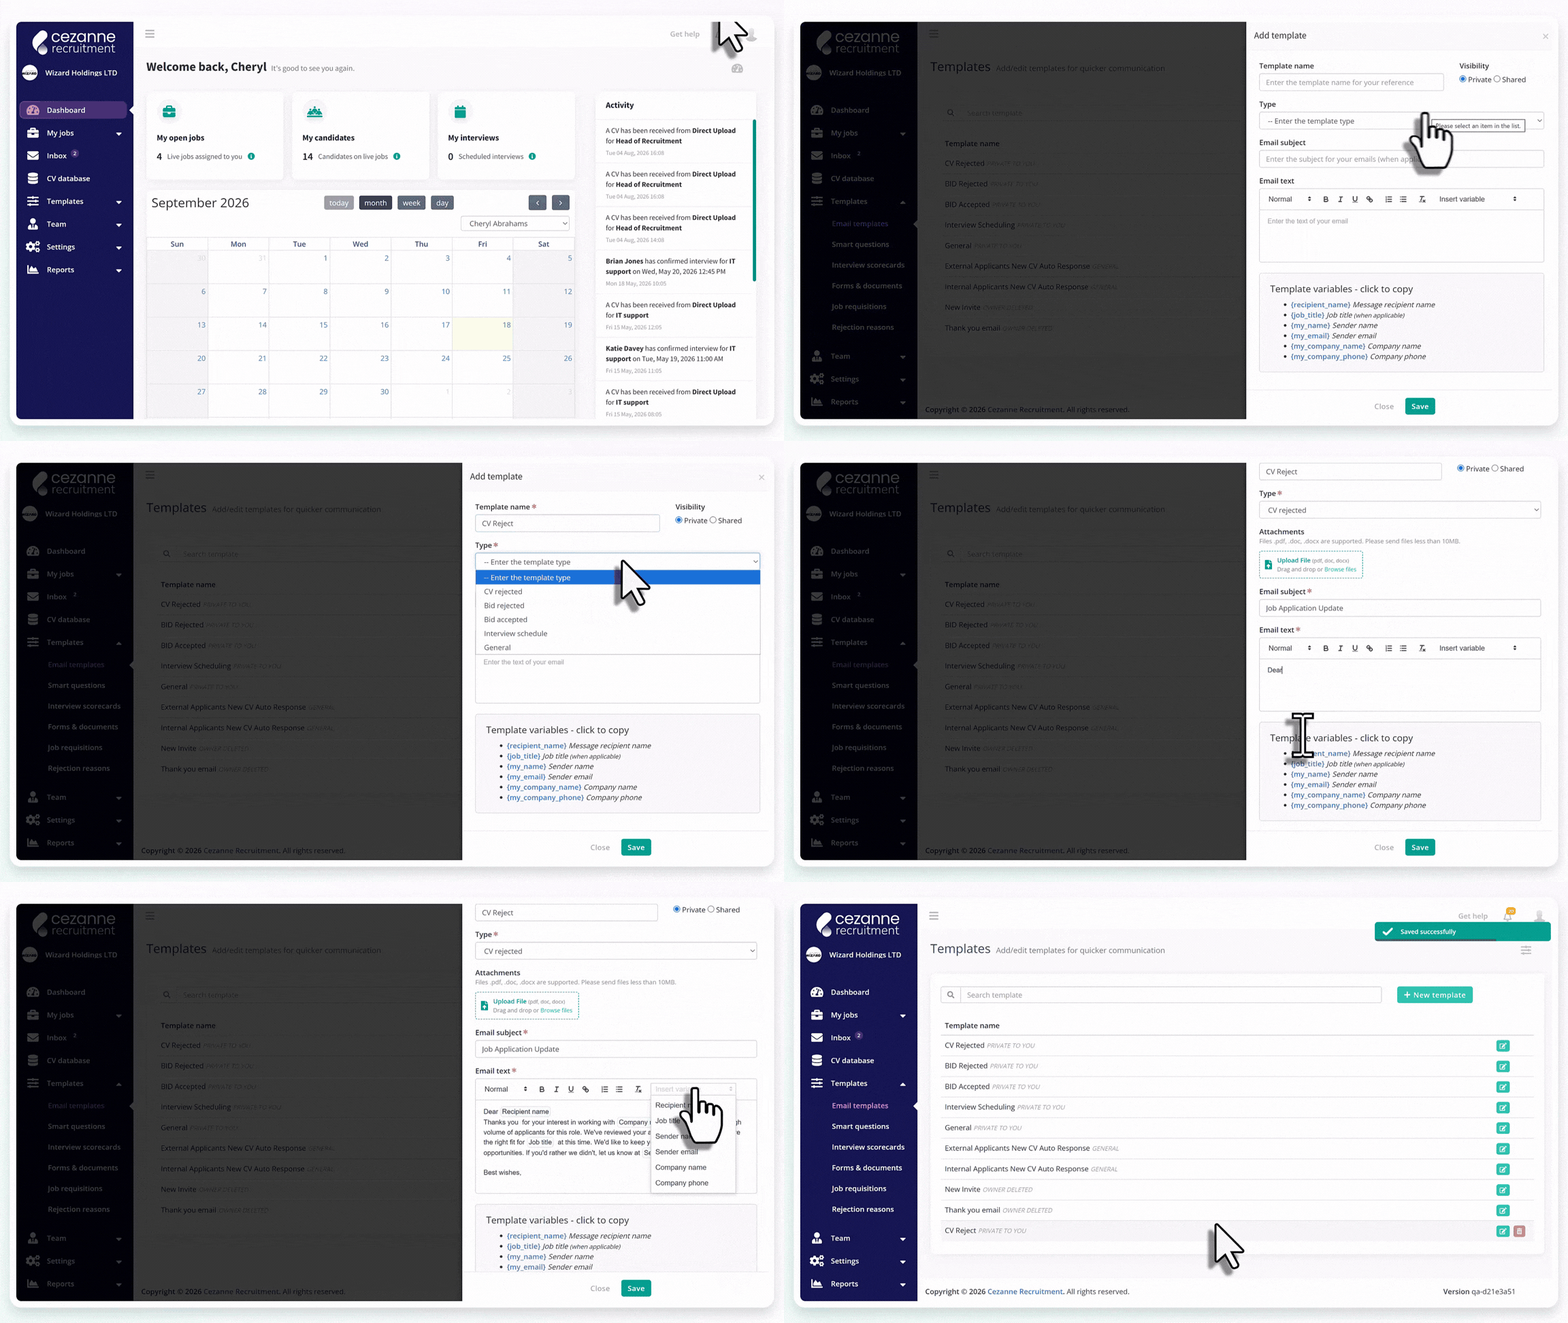
9. Creating & Editing Email Templates
Templates save time by letting you respond to candidates at scale while keeping a personal touch. They're usable at every hiring stage and in your message centre.
Anyone can create and edit their own templates. Only Admins and Super Admins can edit shared (public) templates.
Creating a new template
- Go to Templates then select Email Templates and click + New Template.
- Enter the template name, type, and subject.
- Write the email body. Use template fields to auto-populate details, for example {my_company_name} inserts your company name automatically. Copy the field and paste it as plain text.
- Click Save.
- Choose whether the template is public, meaning shared with your team, or private.
Example template
Name: Application Unsuccessful
Type: CV Reject
Subject: Job Application Update
Dear {candidate_name}, thank you for your interest in working with {my_company_name}. There has been a high volume of applicants for this role. We've reviewed your application but don't feel you're the right fit for {job_title} at this time. We'd like to keep your CV on file for future opportunities. If you'd rather we didn't, let us know at {my_email}.
{my_name}
{my_company_name}
Editing a template
Go to Templates, click the edit icon next to the one you want to change, make your updates, and save.
Email signatures
You can add a signature to your templates, but be mindful of the message file size limit.
If your signature includes images, keep them as small as possible.