In Cezanne HR there are seven different Dashboards which enable certain information to be presented via Widgets. These are:
- Home
- Organisation
- Absences
- Performance
- Workforce Analytics
- Absence Analytics
- Workspaces
This article explains how to configure the layout of these Dashboards by adding widgets, adjusting background settings and locking / unlocking.
It contains the following sections
1. Configuring Dashboards by Security Role
To configure a Security Role's Dashboards, navigate to: Administration >> Security Role >> Select a Security Role >> Security Role Dashboards
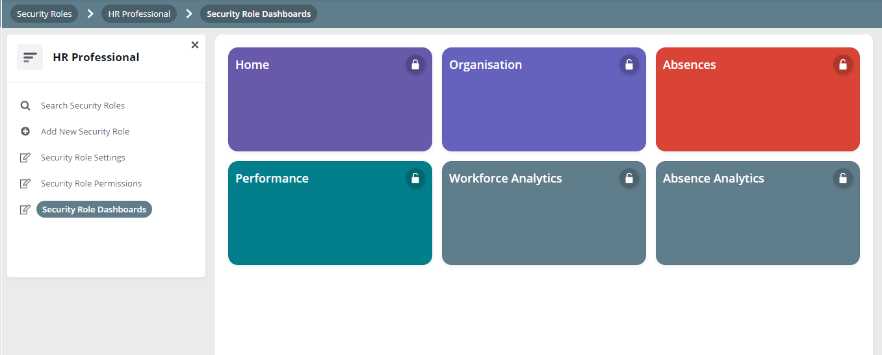
Select the Dashboard you wish to edit, e.g. Home, to open it in Configuration Mode where the following features and options are available:
- Dashboard Grid
- 'Add Widget' tab
- 'Dashboard Settings' tab
- Preview Mode
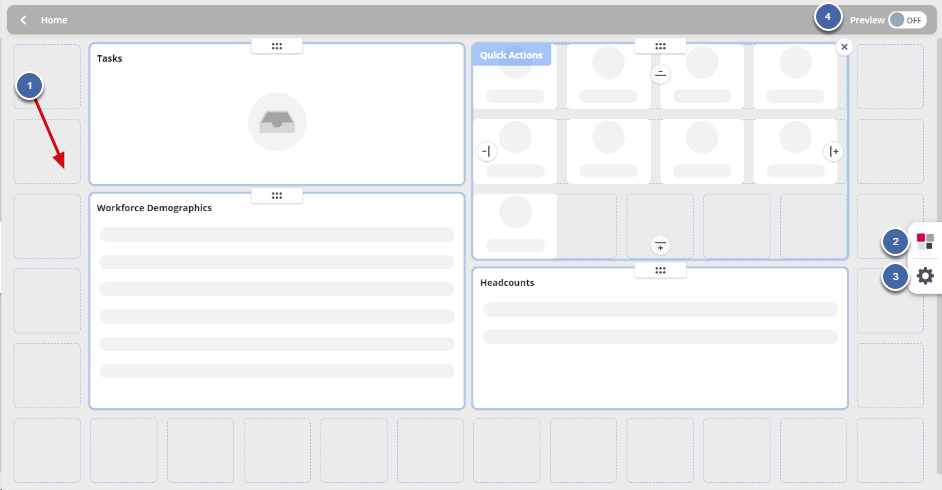
2. Moving and Resizing Widgets
A widget can be easily moved around the Dashboard Grid by using its drag handle.
- When dropping a widget ensure the top-left corner of the widget is within a grid square.
To change the height or width, hover over a Widget and use the '+' or '-' buttons.
- The '-' / '+' signs will decrease / increase a widget's size from the right-hand side and bottom side.
Note:
- To remove a Widget from a Dashboard, click the 'X' button that appears when you hover over it.

3. Adding Widgets
There are many widgets to choose from depending on the Dashboard you are configuring.
- Click on the Add Widgets icon.
- Find the widget you want to add from the available list.
- Drag and drop the widget onto the grid, using its drag handle.
- If necessary, adjust the widget's size.
- Click Save & Exit.
4. Adding a Custom Message / Video
There are two custom widgets available from the 'Add Widgets' list: 'Custom Message' and 'Video Embed'.
Custom Message Widget
This widget allows you to displays text / images using a rich-text field.
- Drag and drop the widget onto the dashboard.
- Click 'Add Content'.
- Enter Widget Title (optional).
- Enter text and/or image in the rich text field.
- Click OK.
Video Embed Widget
This widget allows you to embed a video (or any other iframe) onto a Dashboard. However, you can also use it to embed other types of content, such as a social media feed.
- Drag and drop the widget onto the dashboard.
- Click 'Add Content'.
- Enter a Widget Title (optional).
- Enter the video's embed code ensuring that it is using a <iframe> tag in the HTML.
- Click OK.
For more detailed information about adding content other than a video, see: Dashboard Video Embed Widget.
5. Dashboard Settings
This section explains how you can use the settings to unlock/lock a dashboard, add a background image/colour and adjust the grid alignement.
- Locked - users will not be able to edit their own dashboard.
- Unlocked - users will be able to edit their own dashboard.
2. To add or change the background image:
- Click on the import symbol.
- Select an image.
Note:
- The background image will span the top part of the background on a Dashboard and will automatically be cropped or zoomed to fit the space. However, the size of the image is dependant on the user's screen resolution. We recommend using an image that is 1780 x 525px to accommodate for most screen sizes.
- Centre
- Left
- Stretch (default)
Note:
Resetting a dashboard will affect the following:
- Background image/colour.
- Grid Alignment.
- Widgets on the dashboard.
- Whether it is unlocked or locked.
After clicking Save, you will not be able to undo the reset or retrieve any previous configurations.
6. Locking/Unlocking Dashboards
HR Professionals can lock/unlock Security Role Dashboards from the Settings tab on a Security Role Dashboard screen.
- An Unlocked Security Role Dashboard means users can make changes to their Dashboard using the 'Configure Dashboard' slider.
- Locking a Security Role Dashboard will remove the 'Configure Dashboard'.

Locking/unlocking dashboards will affect what users see on that dashboard, for example:
- If a user makes any changes to one of their Personal Dashboards whilst it is unlocked, it will no longer be linked to the Security Role Dashboard that an HR Professional has configured. Therefore, any changes made to that Security Role Dashboard will not be updated on that user's Personal Dashboard.
- However, locking a Security Role Dashboard will remove the 'Configure Dashboard' slider and any changes a user has made to that Dashboard. Therefore, a user's Personal Dashboard will be linked to the Security Role Dashboard again.
- If unlocked again, any changes a user had made to one of their Dashboards before it's Security Role Dashboard was locked, will be displayed.
