Timesheets are designed to record the time that employees spend on different activities each day within your organisation, which can then be managed by HR all in one place.
Other key benefits include:
- Configurable timesheets for recording time.
- Configurable Timesheet Authorisation process.
- Displays an employee's absences, working time pattern and calendar details.
- The ability to search and report on employee's timesheets.
- The ability to link with Percentage-based Absence plans to calculate holiday entitlement (available with the Absence Module).
This guide introduces the key components that must be set up to enable an employee's time to be recorded in Cezanne and contains the following sections:
1. Timesheets: Duration and Time In / Time Out
A Timesheet is the main screen that is used to record the amount of time an employee has spent on different activities each week.
There are two timesheet formats available within Cezanne:
- Duration - enables employees to enter the amount of hours they spent working on different activities each day.
- Time In / Time Out - enables employees to enter the times that they started and finished activities each day.
As a result of this difference, the Timesheet Format also affects how the timesheet looks:
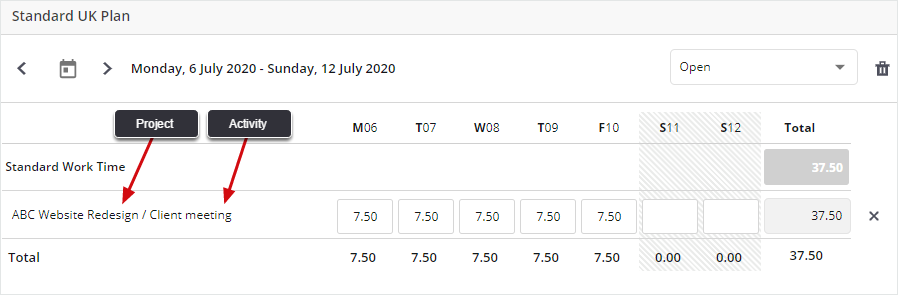
Duration

- Time for each activity is recorded in hours (as a decimal value).
- Activities are grouped by Time Type and ordered alphabetically.
- A full week is displayed on the Timesheet.
- Weekly totals are displayed for individual Activities and also for each Time Type.
- Overall totals are displayed for each day and the week as a whole.
Time In / Time Out

- Time is recorded by entering Start and End Times for each activity.
- Activities are ordered by Start Time ascending.
- The full week is available but each day is displayed separately. Click to view and enter activities on a particular day (Monday is selected above).
- The daily total is displayed for all Activities.
- Overall total time displayed for week.
2. Time Types
A Time Type is a way of classifying different activities on the Timesheet, e.g:
- Standard Work Time
- Overtime
- Travel
Time Types can be useful for organising the Timesheet into different sections. For example, if you wanted to record when employees work more than their standard hours you could create a 'Standard Work' and 'Overtime' Time type. Employees can then enter their standard hours in one section and any overtime in a separate section (as in the screenshot below).

Note:
- Although the screenshot above shows a Duration timesheet, Time Types can be used with both Timesheet Formats.
- If you choose to 'Validate the Timesheet against an Employee's Working Time Pattern', Time Types allow you to decide which activities will be included in the Standard Hours calculation. For more information, see: Validate Timesheet against Employee's Working Time Pattern.

3. Projects and Activities
Time is recorded on a timesheet within Cezanne by using Projects and Activities.
- A Project is a collection of required Activities.
- An Activity is what an employee does within a Project.
- Activities do not exist independently and must be added as part of a Project.
- If you want to add an Activity with the same name to different Projects, it will need to be added separately to each Project.
4. Time Module Checklist
The following checklist shows the main components of the Time module and the order in which they should be set up:
1. Picklists
To begin setting up the Time module, we recommend editing the relevant Time Recording picklists.
Navigate to: Administration >> Other >> Picklists >> Time Recording. The available picklists that should be set up are:
- Timesheet Time Types.
- Timesheet Status.
- Timesheet Activity Types.
For more information about setting up the picklists, see: Time Types.
2. Plan Types
A Timesheet Plan Type must be set up for each plan that you want to use. Once employees are enrolled on a Timesheet Plan Type, they will be able to add Timesheets.
To set up a Timesheet Plan Type, navigate to: Administration >> Time.
- Click Add New Timesheet Plan Type at the top of the page.

- This will open up the Add New Plan Type Screen:

- You can now start filling in the details for your Plan Type.
- If you want to use the Duration format, see: Setting up a Duration Plan.
- If you want to use the Time In / Time Out format, see: Setting up a Time In / Time Out Plan.
3. Linking Absences and Time Module
This option can only be used if you have both the Time and Absences modules and if an employee is enrolled on a Percentage-based absence plan. It gives the ability to link a Timesheet Plan to an Percentage-based Absence Plan in order to automatically record employees' Time Worked and calculate their holiday entitlement from this.
To link the Absence and Time module, tick Link with Absence Time Worked when setting up your Plan Type:

For more information, see: Linking Absences and Time Module.
4. Projects and Activities
Next, create Projects and enter the dates that they are effective for. You can then add the relevant Activities to these Projects.
To do this, navigate to: Administration >> Time >> Projects.
- Click Add New Project at the top of the page:

- This will open the screen below:

- First fill in the Project Details.
- Add Project Activities.
For more information on setting up Projects and Activities, see: Projects and Activities.
5. Enrol Employees on Plans
There are two ways to enrol employees:
- Manual Enrolment - by enrolling individual employees to Plan Types using the Timesheet Plans screen.
- Data Import - using the Timesheet Plan Enrolment by Employee import.
To manually enrol employees, navigate to: People >> Select a Person >> Time Recording >> Timesheet Plans:

- Input the Effective From and Effective To dates.
- Select the Plan Name from the picklist.
- Click Save and Close.
Repeat this for each employee you want to enrol on a plan.
For more information about using data imports, see Importing Data.
6. Assign Activities to Employees
When using the module you can choose whether employees have:
- All Projects and Activities available to select.
or
- A restricted list of Projects and Activities available to select.

7. Working Time Patterns and Calendars
If you haven't purchased Absences, Working Time Patterns and Calendars are optional. However, the benefits of your employees having Working Time Pattern and Calendar records when using the Time Module are that the following are reflected on the Timesheet:
- Working and Non-working hours.
- Bank Holidays.

8. Timesheet Authorisation Process
To enable employees to enter activities on a timesheet, you must activate the Timesheet Authorisation Process. This process enables an employee's timesheet to be approved / changed by their supervisor (or another reviewer) once it has been submitted. You will need to ensure that any employees, who need to enter or approve timesheets, have an active user account.
For more information about activating this process, see: Timesheet Authorisation Process.
Administration >> Setup & Security >> Processes

